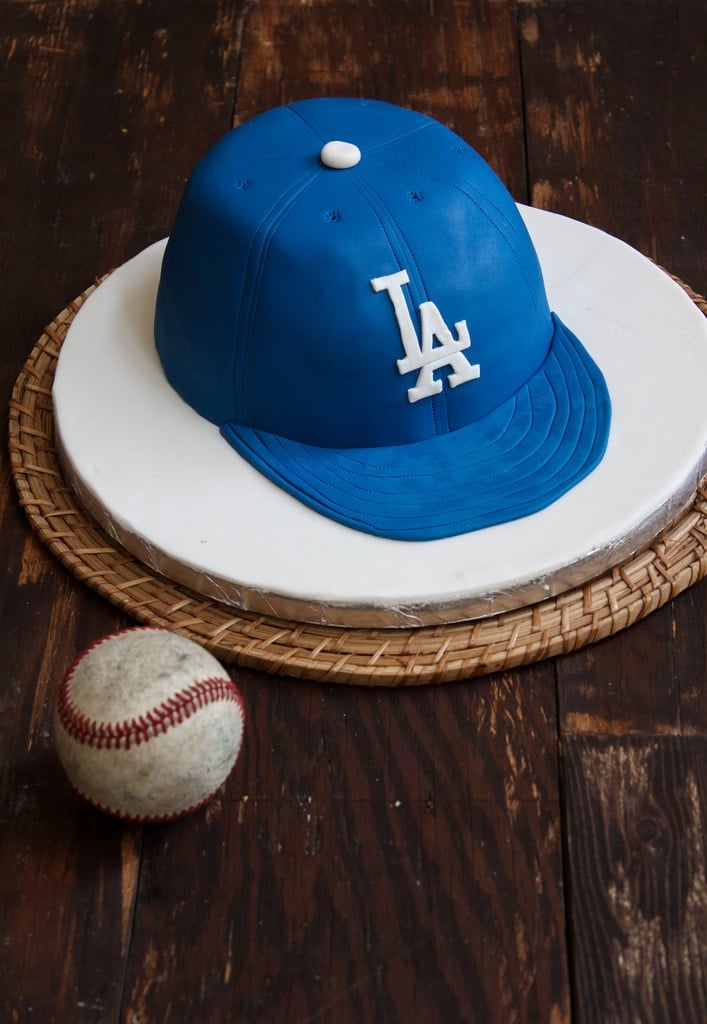
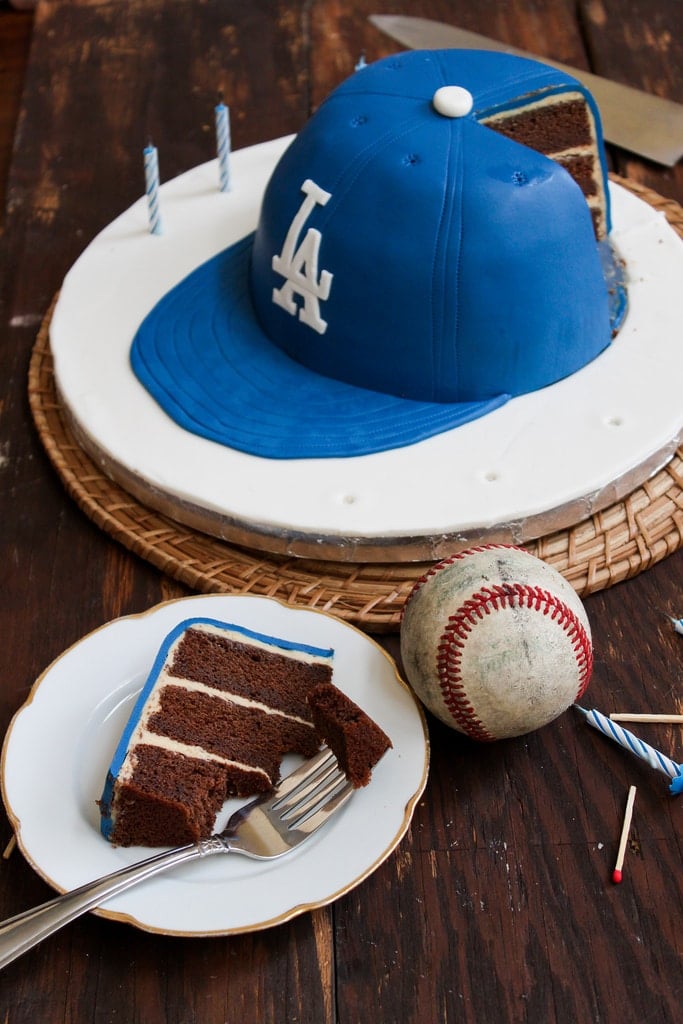
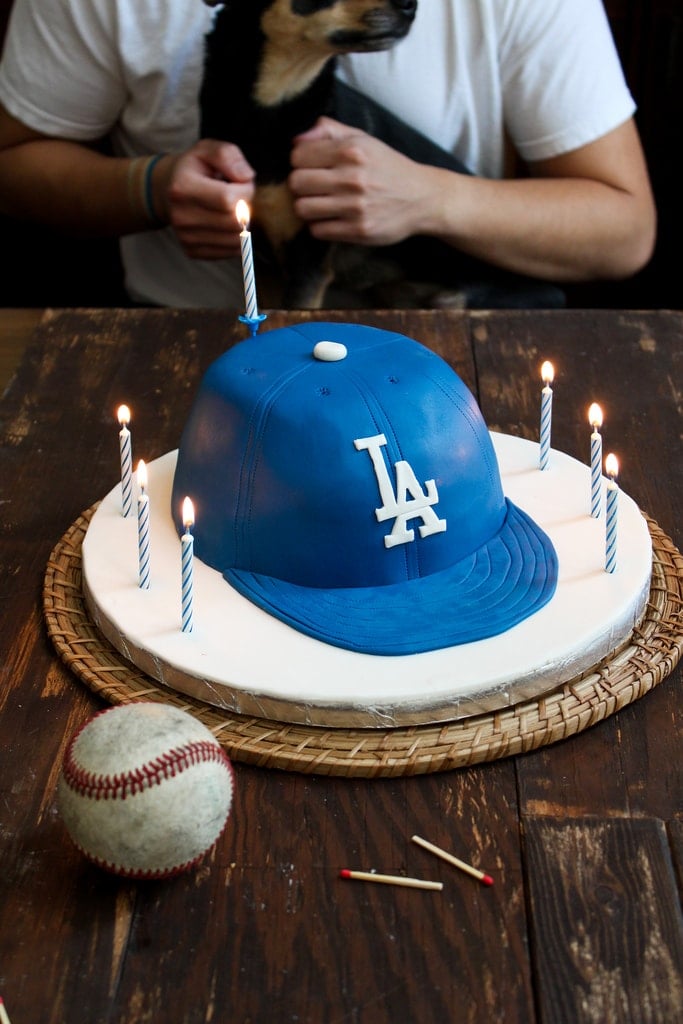
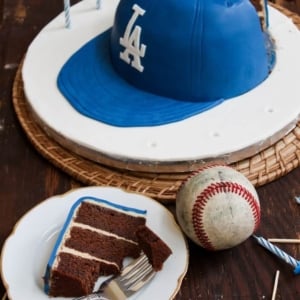
Los Angeles Dodgers baseball hat cake made with chocolate cake and peanut butter frosting. Assembled cake is decorated with edible fondant.
Happy birthday to my sweet Alex!
For as long as I’ve known Alex, he’s always had his Dodgers hat. He wears it work everyday instead of a Chef’s toque, he wears it every afternoon when we walk Charlie around the park, and I know he’s having a bad hair day when I see it on in the house.
Alex is a big Dodgers fan. We try to go to as many games as possible.
In honor of his birthday, I set out to make a Dodgers baseball cap cake!
Baseball Cap Cake
This is a fairly easy cake to shape. I suggest using a serrated knife to shave the cake to the proper shape. A small pairing knife size is easier to manage than the standard cake knife or bread knife.
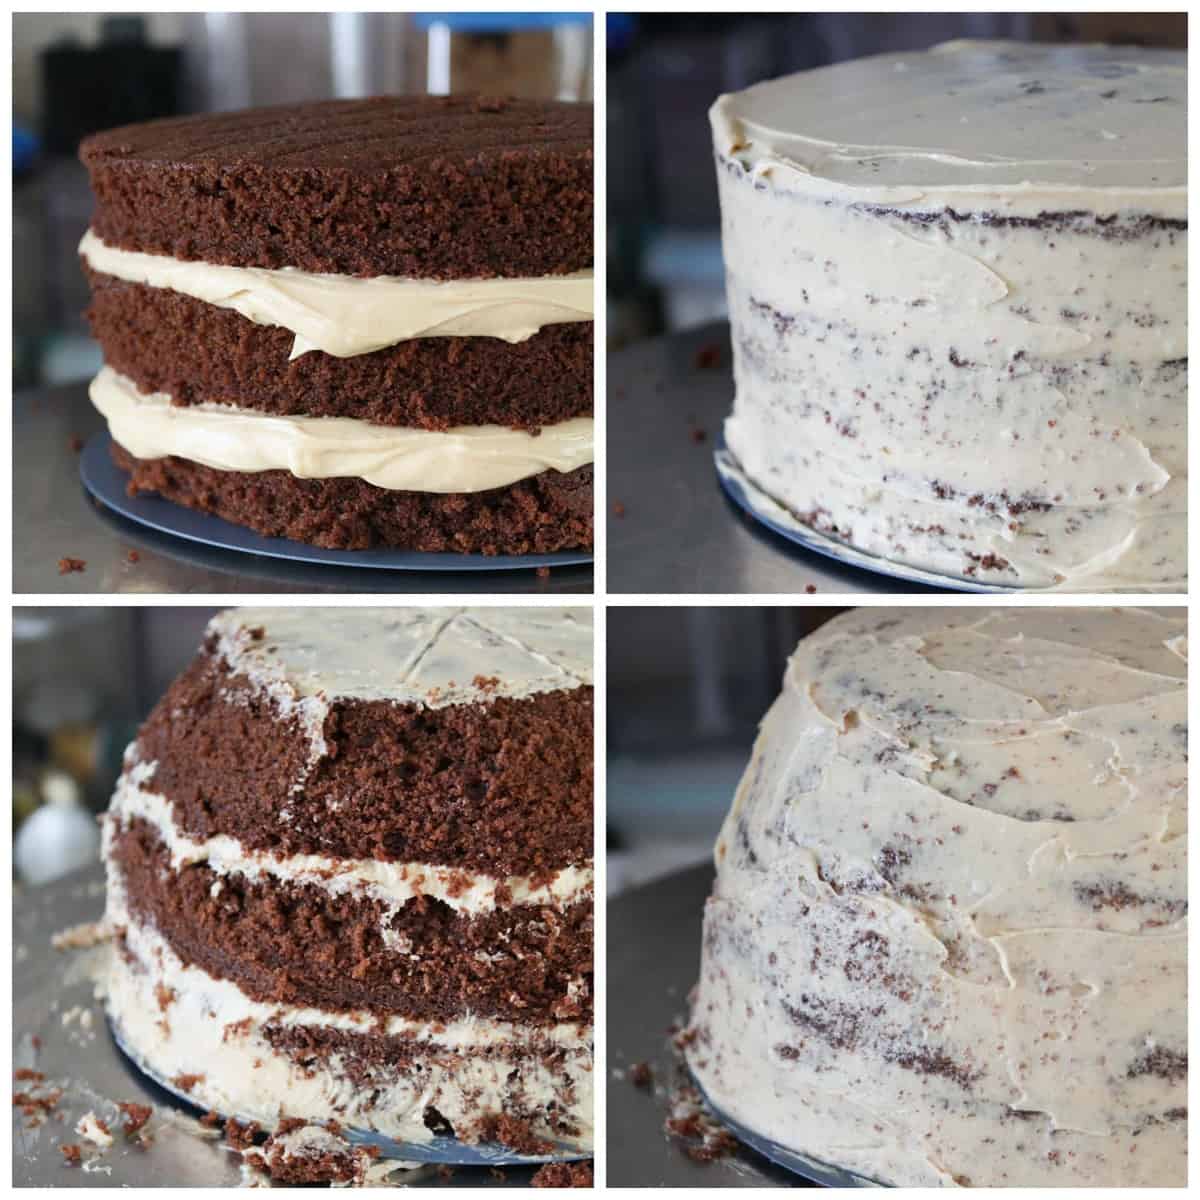
The baseball cap cake starts off like another other stacked layer layer. The recipe here makes enough for four layers. You can use three or four layers to build the cake.
Build and frost the cake as usual. Finish with a crumb coat. Then, place the assembled cake in the fridge for at least an hour to firm up.
It will be easier to shape the cake if the cake is chilled firm.
Use a small serrated knife or small paring knife to carve the cake into the shape of a baseball cap.
This is wear the artistic skills and hand-eye coordination kicks in. Shave off a little bit at a time until you get the proper shape of the cap. Once you’re happy with the shape, proceed with another crumb coat to seal up the cake. Place it back in the fridge for another half hour or so.
Cover cake with fondant and decorate
This cake was relatively easy to make. Coloring the fondant was the tricky part. It took me almost an hour to get a color I was satisfied with.
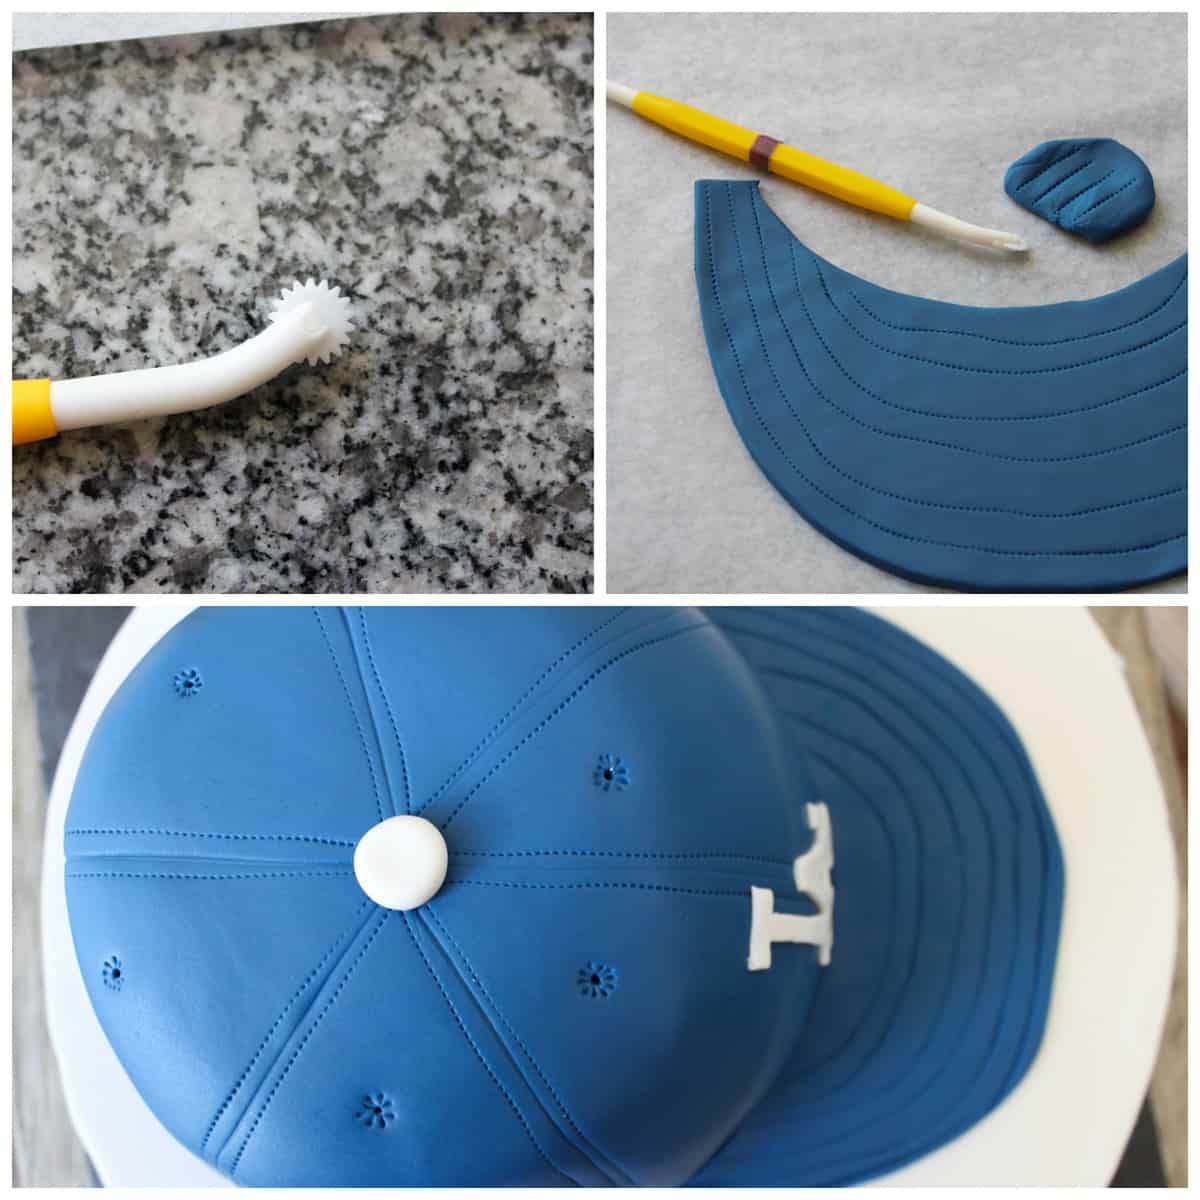
Once the cake is firm, roll the colored fondant into a thin even layer. Gently and quickly cover the cake with fondant, smoothing out the bumps with the palms of your hands or a fondant smoother tool.
The bill of the cap is attached onto the cake separately. Place the cake on a cake board or plate, then measure the appropriate size of the bill. Using the cool tool pictured above (serrated quilting/cutting wheel), create the stitching on the bill. Use the same tool for stitching in the cap. I used a toothpick to create the air vents on the top of the cap. I used a small cutting wheel to make the seams between the stitching.
As for the LA logo, I drew that out by hand and cut it out of the fondant using a sharp x-acto knife.
Alex is a big fan of Reese’s peanut butter cups. We have a stash of the mini cups at home at all times. We both agree it’s the perfect combination of sweet chocolate and salty peanut butter.
Reese’s sets the bar for anything with chocolate and peanut butter. Naturally, I had to make his birthday cake with the same sweet and salty ratio.
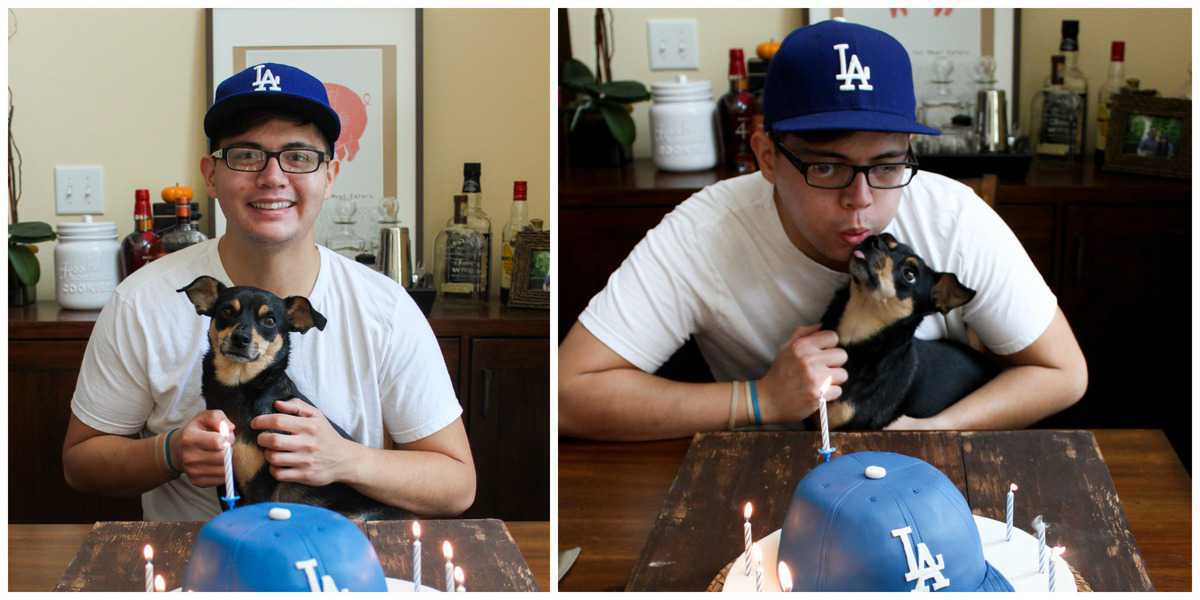
Also, happy early birthday to our adorable pup, Charlie! He turns 2 in a week!
Chocolate Layer Cake with Peanut Butter Frosting (baseball cap cake)
Ingredients
Chocolate Layer Cake (four -8 inch rounds)
- 2 ½ cup all-purpose flour
- 1 tsp baking soda
- 1½ tsp kosher salt
- 1 cup unsweetened cocoa powder
- 2 Tbsp instant espresso powder
- 1½ cup unsalted butter,, room temp
- 2 ½ cup granulated sugar
- 4 large eggs, , room temp
- 2 ¼ cup whole milk,, room temp
- 2 tsp pure vanilla extract,, or vanilla paste
Peanut Butter Frosting
- 1 cup unsalted butter, , room temp
- ⅔ cup smooth peanut butter
- ½ tsp kosher salt
- 3 cup confectioners' sugar (powdered sugar), sifted
- ¼- ½ cup heavy cream, ,adjust according to desired consistency
Instructions
Chocolate Layer Cake:
- Preheat oven to 350°F. Butter and lightly flour 4- 8 inch cake rounds. Line with parchment paper and set aside.
- In a medium bowl, whisk together flour, baking soda, salt, cocoa powder, and espresso powder. Make sure there are no cocoa powder lumps. If desired, sift ingredients together. Set aside.
- In the bowl of a stand mixer fitted with a paddle attachment, cream butter until smooth. Gradually add sugar and beat until lightened in color and fluffy in texture. Scrape down bowl as necessary.
- Add eggs one at a time, ensuring each egg is incorporated before adding the next one. Scrape bowl as necessary to ensure even mixing.
- Add vanilla extract to milk.
- Add 1/3 of dry flour mixture to mixing bowl. Mix on low speed until almost combined. Follow with 1/2 of milk mixture. Repeat and end with last 1/3 of flour mixture. Mix until thoroughly combined and there are no streaks of flour left.
- Divide batter evenly between four 8-inch cake rounds. (If you only have two cake rounds, divide by two and split cake layers after baking.) Use a mini offset spatula to even out the cake batter. Bake for 25-30 minutes until cakes are done and toothpick inserted in center of cake comes out clean.
- Let cakes cool for 5-10 minutes before unmolding. Let cake cool to room temperature on wire rack.
Peanut Butter Frosting
- In the bowl of a stand mixer fitted with a paddle attachment, beat together butter and peanut butter until smooth and combined. Slowly add sifted powdered sugar and mix on low speed until incorporated. Add cream and mix until desired consistency is achieved.
Notes
Nutrition
Nutrition information is automatically calculated, so should only be used as an approximation.
 Like this recipe? Rate & comment below!


Hi! I love this tutorial. I was thinking about using box cake mix, but after reading your recipie I think I am going to go for it! Now, I am not much of a baker- more of a decorator – I am thinking of omitting the espresso powder since the cake is for my 2 year old nephew. Would you recommend replacing it with another ingredient or simply take it out? Thanks for your time!!!
Hi Michelle! The espresso powder helps to highlight the chocolate notes. You can simply omit it, if you like. Hope your nephew loves the cake! :)
This looks great! I’ve only covered a cake in fondant twice but both times the fondant gathers in pleats towards the bottom no matter how much I try smoothing it out, it just bunches. Any tips you can offer? (I think my fondant may have been too thick too). Thanks in advance.
Hi Jessica! Take the cake pan you used to bake the cakes and turn it upside down. Place the finished cake on the cake pan. Then proceed to cover your cake in fondant. Smooth out the wrinkles beginning at the top of the cake and work your way down. Use a knife to cut the excess fondant at the bottom of the cake. Best tips: 1) make sure the fondant is soft and pliable 2) make sure the fondant is the same thickness all around [I like to roll the fondant as thin as possible because I find it easier that way. Also means less fondant wasted/used.] 3) work quickly and don’t hesitate. If you mess up you can always remove the fondant and start over.
I can’t think of a better surprise than you gave me with this cake. Looks great; tastes amazing. Thanks again Mey!